Sunday 29 April 2018

The Ultimate Macaroni Cheese Calzones

Inspired by friends of ours, my other half decided that making these would be the best possible use of my day off and I have to admit, he was right. These calzones are bursting with macaroni cheese and whatever else you fancy piling into them: we had pulled pork for the omnis and a spinach and mushroom mix for the veggies. I made the pizza dough from scratch which was surprisingly easy but you could easily buy it from the your local shop if you're short on time. I made this into 6 calzones with macaroni cheese to spare but the calzones were mutantly huge so I would suggest making them into 12 (they can be frozen). I made the base of these dairy free then added dairy to the ones for those who can eat it. This dish is a bit of a labour of love but entirely worth all the effort.

The spinach, mushroom and macaroni cheese calzone 


Ingredients 

For the Pizza dough
1kg strong white bread flour
1 tsp salt
2 x 7g packets of fast action yeast
1 tbsp caster sugar
4 tbsp olive oil
650ml lukewarm water

The pulled pork and macaroni cheese calzone 

For the Macaroni Cheese

3 packets Tesco Free From cheese sauce mix (see picture)
600ml soy milk
salt and pepper to taste
1kg macaroni
Approx 1/2 each of bags of pre-grated mozzerella and cheddar or 2 blocks of free from cheese if non-dairy

The perfect dairy-free cheese sauce 
For the filling
1 box mushrooms
1 medium bag fresh spinach
salt and pepper
butter (dairy free)
1 frozen pulled pork packet (unless you can make your own)
2 tbsp BBQ sauce

For the Sauce
2 boxes of passata
5 tbsp BBQ sauce
3 tsp mixed herbs
salt and pepper

Method

Combine the salt and flour in a bowl and set to one side. In a jug add the olive oil, sugar and yeast to the warm water and leave to stand for a few minutes. It should start to look like something out of an alien movie. Add the water mix to the flour mix and slowly bring together to create a soft dough. Tip this onto a floured surface and kneed until the dough is stretchy, smooth and pings back when compressed. Place in a bowl with a damp tea towel over the top in warm place for an hour or until the dough has doubled in size.

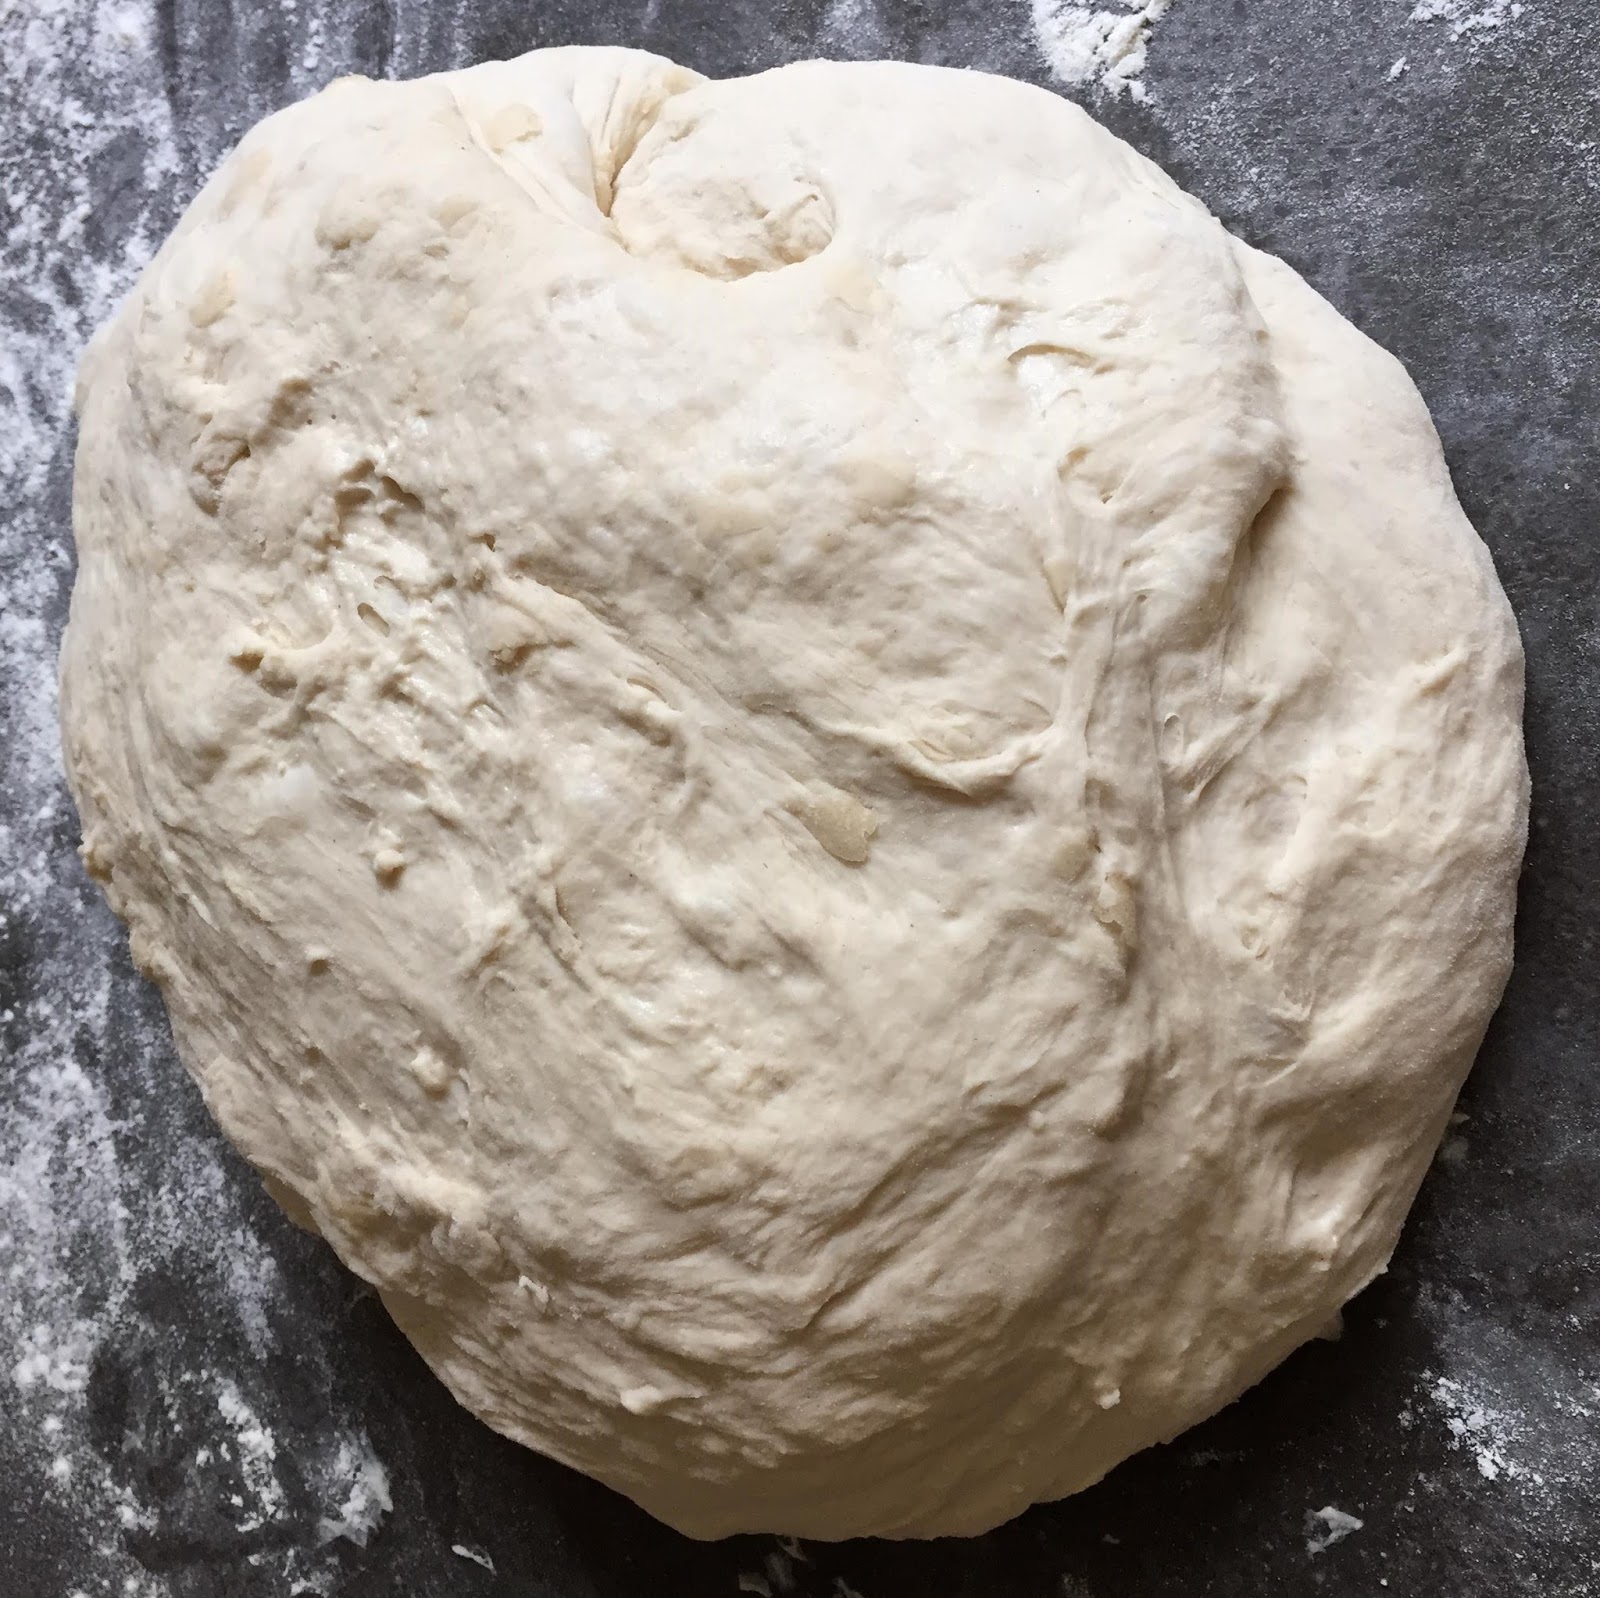
The pizza dough before going to prove 
Whilst the dough is resting, cook the pasta to the instructions on the packet. In a separate pan, add the soy milk and cheese mix packets and simmer over a low heat until thickened then add salt and pepper to taste. Mix this with the cooked and drained pasta before adding the cheese and stirring over a low heat to melt everything together. I separated out some of the macaroni and sauce before adding the cheese so I could do part dairy free and part with 'real' cheese. Leave to cool.

Finely chop the mushrooms into bitesized pieces and saute in butter, salt and pepper until soft then add the spinach and saute both together until the spinach has wilted and the mushrooms have caramelized slightly.

Cook the pulled pork to the instructions on the packet and add the extra BBQ sauce alongside the sauce from the packet.

Once all the fillings have cooled, take the pizza dough and kneed again to knock some of the air out of it on a floured surface. Section it off into 12 pieces then taking a piece at a time, carefully form a ball of dough then use your knuckles to push it out into a rough circle. Pick the dough up and use its own weight to stretch it to double the size you would like your calzones to be. Carefully place a thick layer of macaroni cheese on the dough then place another layer of your chosen filling on top. Fold the dough over and press around the edges to seal the calzone. Place on a lightly floured baking tray and repeat the process until you have all your calzones.

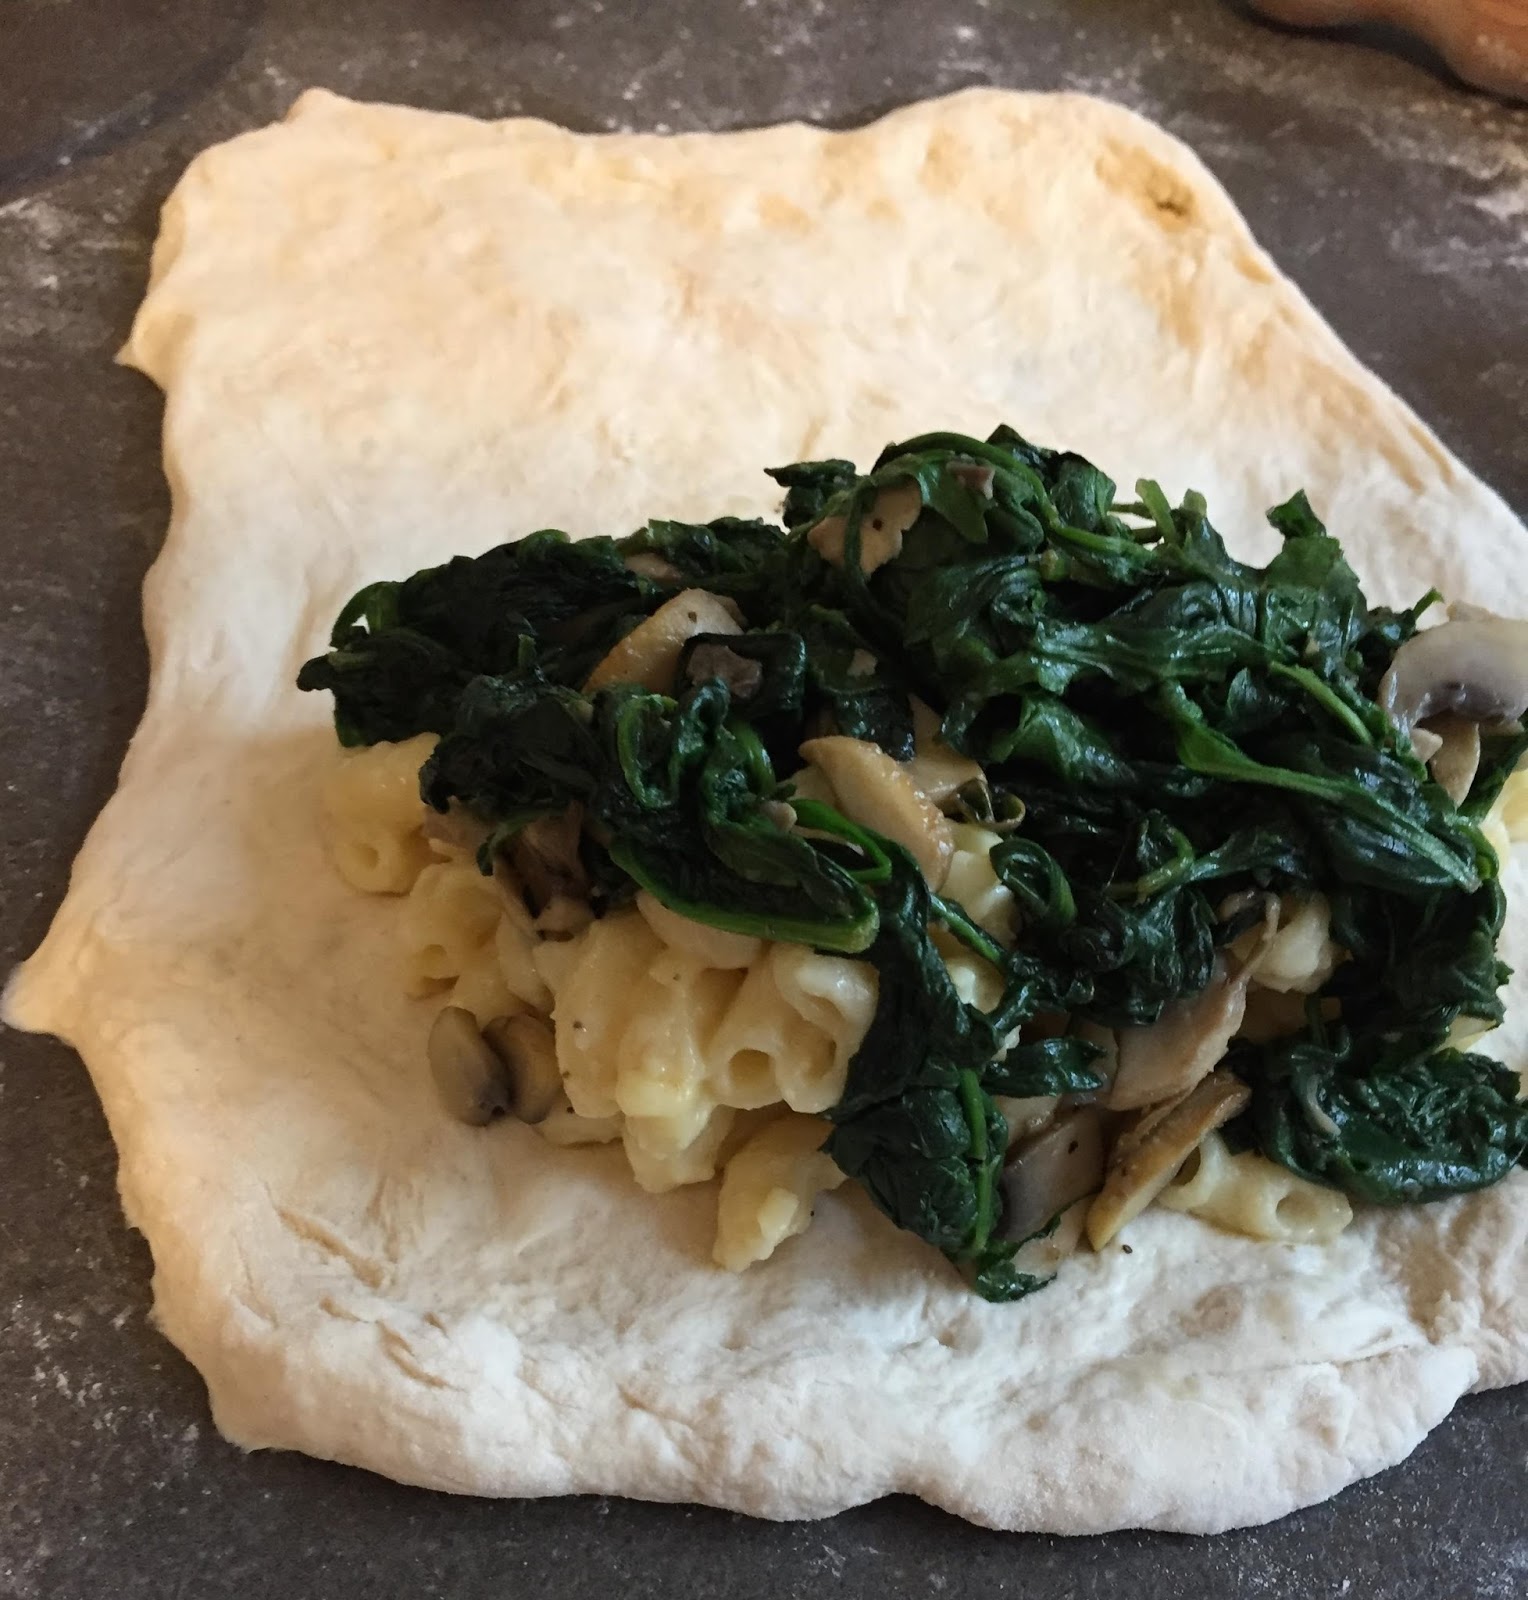
Filling the calzones 

Bake for around 30 minutes at 160c until the calzones are lightly golden brown and hot through.

While the calzones are baking combine the passata and BBQ sauce in a pan with the mixed herbs and salt and pepper to taste and bring to a gentle simmer.

Tomato sauce 
We just had the calzones on their own topped with the tomato sauce and extra cheese but a side of green vegetables would help to lift the dish if your not feeling like a total carb coma after.

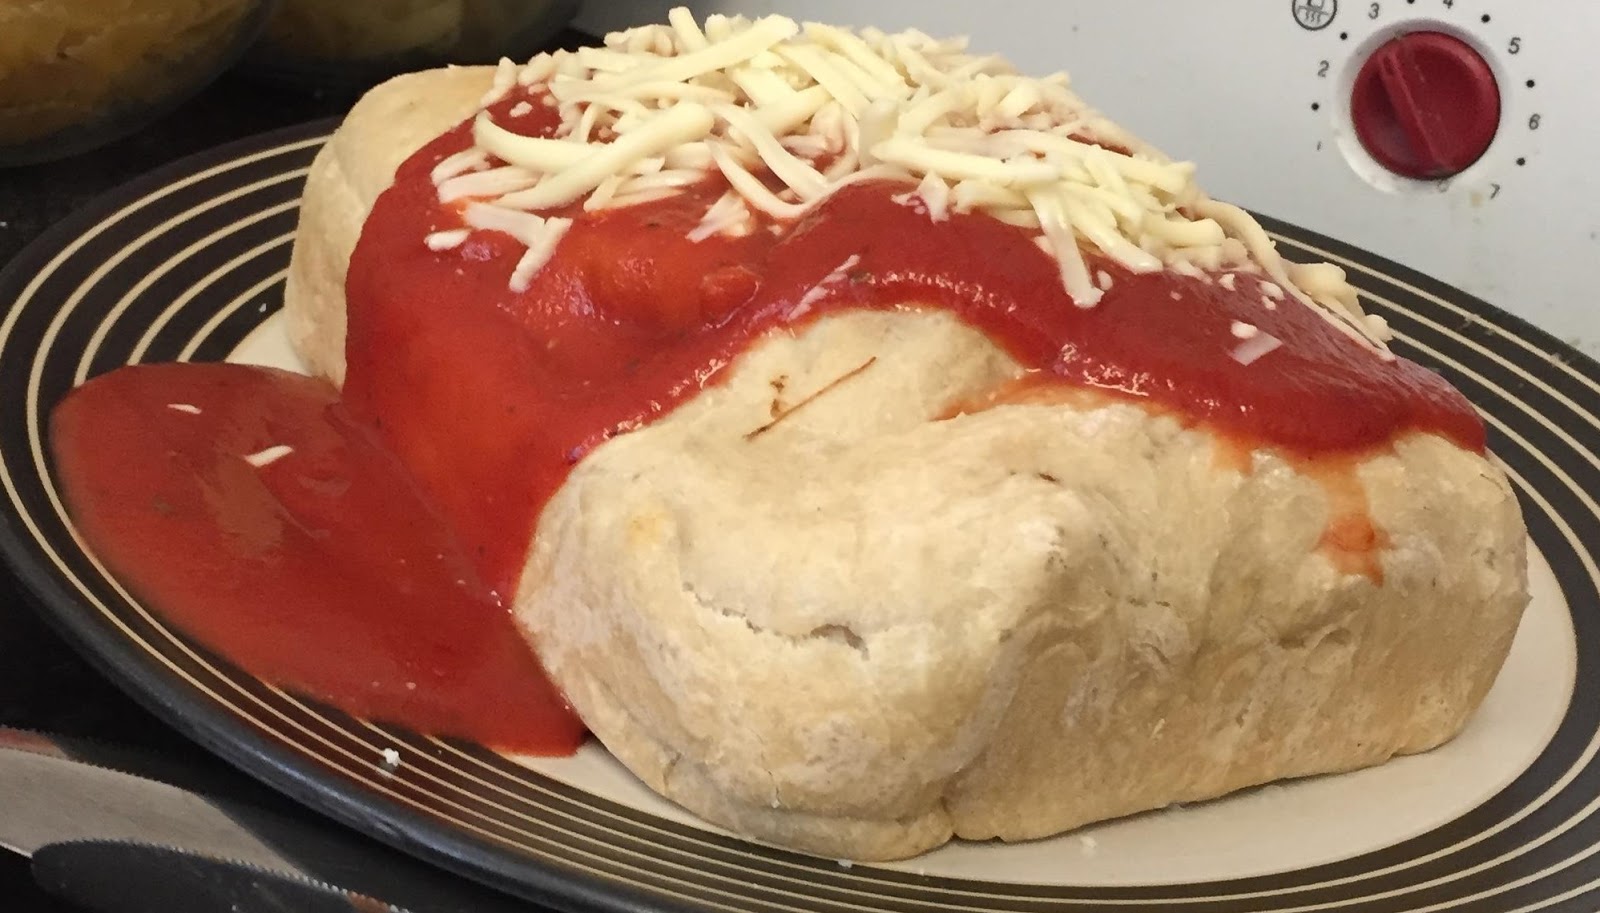
Mammoth calzone ft the OH's wonderful photography skills! 

Please make this recipe, I KNOW you will love it. When you do, take a picture and tag me using #diaryofadefectivehousewife.

Enjoy!

Sunday 22 April 2018

Home-made Pesto

Nettles are a big thing in my family, the first batch of nettle soup usually signifies that me and my brothers birthdays are approaching as this was one thing we always had as part of our birthday meals growing up. Where we used to live nettles grew in abundance and huge pans of soup were easy to make. I now don't have this easy access to them but managed to get my hands on roughly half a carrier bags worth when visiting my mum. A lot of people are put off nettle by the idea of being stung but as long as you are careful and prepare them properly they offer a fantastic, slightly earthy taste and are packed full of goodness.


Be careful when picking, either wear gardening gloves or washing up gloves and just pick the young shoots from the top of the nettles. Always rinse them well after picking and ensure to pick over them removing any other leaves or creatures that may have accidentally been picked. You can also quickly blanch the nettles in hot water before preparing but the ones I used were very young and non-stingy.


Ingredients:

1/2 carrier bag of nettles
250g sunflower seeds
1 handful fresh basil
1 handful fresh chives
juice of 1 lime
6 cloves garlic
olive oil
salt and pepper to taste


Method:

Once you have prepared the nettles, place the all the ingredients excluding the nettles and oil into a food processor and blitz to a smooth paste. Add in the nettles (I chopped mine roughly as my processor is small and not overly powerful) and blitz again, slowly adding the olive oil until a smooth paste is formed. Add salt and pepper to taste then decant into jars or boxes to store in the fridge. This will oxidize slightly but its nothing to be concerned about.

I have used this pesto to top a bowl of vegetable soup adding a fresh earthiness and also stirred through pasta for a delicious take on a classic.

Please tag me using #diaryofadefectivehousewife when you make this, cause you really should! Be brave!

Monday 16 April 2018

Pear and Banana Muffins

To me, a muffin is kind of a cross between a dough based bun and a cupcake which its semi-acceptable to eat for breakfast. These ones contain two different types of fruit so must be at least a little health! I had some leftover cooking chocolate from a previous recipe so I melted this down with a dash of vanilla extract and drizzled it over the top but do omit this if you are pretending these are healthy. Not overly sweet, these make a great snack or I would happily scoff one with a cuppa for breakfast without too much guilt. Winner! These are also very easy to make and could easily be done with kids to get them involved with their food.


Ingredients:
3-4 large ripe bananas
1/2 cup of sugar
2 large eggs
2 tbsp olive oil
1 tsp vanilla extract
1.5 cups plain flour
1 tsp bicarbonate of soda
1 pinch salt
1 large pear, chopped into small cubes

Optional:
1 bar dark cooking chocolate
2 tsp vanilla extract


Method:

Preheat your oven to 180c and pop 12 muffin cases into a muffin tin. In a large bowl mash the bananas then add in the sugar, eggs, oil and vanilla and beat gently to combine. Carefully fold in the flour, bicarb and salt to create a thick doughy batter then fold in the pear chunks taking care to stir as little as possible so as to not overwork the dough.

Place roughly 2 tbsp of the mix into each cupcake case before baking for 25-30 minutes until golden brown and a skewer come out clean when inserted down the middle. Take out of the tray and leave on a wire rack to cook. I could resist the smell and had one still hot out the paper resulting in  burnt fingers and tongue but totally worth it!

Once the muffins have cooled, melt the chocolate and vanilla together in a pan over a low heat and drizzle the chocolate over the top of the muffins for a more indulgent treat.

When you make these, please take a picture and tag me using #diaryofadefectivehousewife

Enjoy!


Sunday 8 April 2018

Rhubarb Jam

Rhubarb is a massive favourite in my home in all forms, especially crumble but recently it was on offer and I grabbed an armful without thinking only to get home and realise I already had  a cake in the pipeline and it would be a bit fat even for us to make both! Racking my brains, I decided to make my first ever batch of jam and couldn't believe how easy it was. The hardest part of this recipe is waiting for it to thicken and not sticking a finger in the boiling mix to try it, the smell is incredible.


Ingredients:
1kg rhubarb
2 cups white sugar
Juice of half a large orange
zest of one large orange
1 cup water

Method:

Clean and chop the rhubarb into bite sized pieces and place in a large pan with the rest of the ingredients. Bring to a simmer over a medium heat and leave to cook, stirring occasionally. Once the mixture is thick and the rhubarb has broken down, its cooked. Sterilize three jars with boiling water and then carefully pour the mixture in. Leave to cool completely then pop in the fridge to set fully.

This recipe is incredibly easy to make and tastes incredible. Try topping my perfect crusty bread http://whatsaffydid.blogspot.co.uk/2017/06/perfect-crusty-bread.html with this jam for the ultimate home made treat.


Sunday 1 April 2018

Battenburg Cake

Battenburg is a huge favourite in my home and I personally love anything wrapped in marzipan. This is my take on my Granny's recipe and is far easier to make than I had originally thought. I used raspberry jam through the cake rather than the more traditional apricot and my 'pink' turned out rather darker but the definition is clearly there and it tasted amazing. This makes two cakes, neither of which lasted long at all.


Ingredients:
175g butter x2
175g caster sugar x2
140g self raising flour x2
50g ground almonds x2
1/2 tsp baking powder x2
3 medium eggs x2
1/2 tsp vanilla extract x2
1/2 tsp almond extract
1tsp pink food colouring
1 jar seedless raspberry jam
500g block marzipan x2

Method:

Preheat your oven to 160c fan and line an 20cm square tin using two strips of baking paper crossed over at the base. Place one set of the butter, sugar, flour, almonds, baking powder, eggs and vanilla extract into a large bowl along with the almond extract and mix until all the ingredients are thoroughly incorporated and the mixture is glossy and smooth. Pour this into the baking tray making sure to carefully level the top of the cake. Bake for 20-25 minutes until a skewer comes out clean and the cake springs back to the touch. Let cool in the tin while you make up the next batter.

Place the second set of ingredients into a large bowl, replacing the almond extract with the food colouring. I would add this a little at a time until the desired colour is reached, you may need slightly more or less depending on the brand used. Remove the first cake from the tin and repeat the process of lining the tin and baking the second cake. If you are lucky enough to have two tins then both cakes can be baked at the same time.


Leave the cakes until they are entirely cool. Use this time to do the washing up and do battle with the marzipan! Take a block of marzipan and warm it between your hands to make it more pliable. Place between two large sheets of baking paper and use a heavy rolling pin to roll the marzipan to approximately 20cm x 20cm and 0.5cm thick, a little extra length and width is great as it can be trimmed off but leaves room for error!

Gently heat the raspberry jam until it becomes runny and easy to work.

Carefully cut each cake into 4 slices approximately the same width. You could use a ruler for this step but I just eyeballed it with surprising success.

Peal the top layer of paper off the marzipan but leave it on the bottom layer as this helps to wrap the cake. Carefully paint the marzipan with jam then place a slice of the almond cake across the middle. Put jam down the side of the slice of cake and gently press in a pink slice. Spread jam over the top of both before placing the second slices over the opposite colour to create the checkerboard look. Carefully wrap the marzipan round the cake using the baking paper to allow you to run your hands over and smooth it all out. Carefully trim the edges of the marzipan to create clean lines then wrap tightly in the paper to help mould and secure the shape.

Repeat this process with the second block of marzipan and the remaining slices of cake.

Each cake makes roughly ten slices and can be frozen for up to a month after baking if there's any left. I would recommend slicing the cake before freezing it for faster defrosting and an easy treat.

This cake looks great and is far easier to make than it looks, it just requires a little time and patience. When you make it please take a picture and tag me at #diaryofadefectivehousewife