Sunday, 30 December 2018

Spiced Apple Celebration Cake

I have been making variations of this recipe for the last 5 or so years over the festive period, adapting it as I've gone. I always make it to share with the family and since we now have a coeliac in our midst I always use gluten-free flour but regular can also be used. This recipe has a wet batter so works particularly well with gluten-free flours, my brother gave it a 10/10 for 'mouth-feel' and hes known to be brutally honest when it comes to my baking. It could be decorated in a million different ways, Ive used fake trees, sledges, snowflakes and all kinds over the years but fancied something a little more understated this year. Ideal for making for New Years to have with a cuppa after the bells, this cake is one of the few fruit cakes around that tastes great as soon as its baked. If you are baking this gluten-free, be sure to check your baking powder is suitable and be aware of cross-contamination.


Ingredients:
200g butter - I use dairy-free
200g dark muscavado sugar
3 eggs
1 tbsp black treacle
200g self-raising flour - I use gluten-free
2 tsp cinnamon
1 tsp nutmeg
1/4 tsp clove
1 tsp baking powder
2 eating apples (approx 100g each)
100g crystalised ginger
200g mixed dried fruit
2 sheets pre-rolled marzipan
2 sheets pre-rolled royal icing
1/2 jar apricot jam
food safe glitters


Method:
Preheat your oven to 180c fan and line two 20cm cake tins with a circle of baking paper in the base and butter up the sides.

Chop the apples into quarters and remove the cores before grating, leaving the skins on though I discard any skin that doesn't grate. Chop the pieces of ginger to roughly the same size as the rest of the dried fruit and put to one side with the apple.


Grab a large bowl and mix together the butter, sugar, treacle, flour, baking powder, eggs and spices to create a thick batter. Carefully fold in the apple, ginger and mixed fruit and stir until everything is combined. The mixture may look as if it has split slightly but don't worry, it bakes just fine.


Spoon half the mixture into each of the cake tins and bake for 45-55 minutes until they are dark golden, a skewer comes out clean and the cakes are pulling away from the sides of the tins. Carefully run a palette knife around the edges of the cakes to free them and turn out onto cooling racks. Remove the baking paper from the bases to stop the cakes sweating then place base down on the racks to cool.


Once the cakes are cool, pop the apricot jam into a pan over a low heat to soften and become slightly runny. Place the cakes on base boards or plates and spread the top and sides with a layer of the apricot jam. Carefully unroll the marzipan and lay over the top of the cake. Smooth the top down then work down the sides, pressing them to the cake before trimming off the excess. I have a smoothing tool which makes the process much easier but it can be done with your hands and a knife. Once the marzipan is smooth, place the icing over the top and repeat the smoothing and trimming process, tucking the cut edges gently under the cake for a smooth finish.


I used the leftover icing scraps to create stars which I then dusted with glitter for a festive finish. I then placed them on the cakes and gently pressed them into place.


When you make this, please take a picture and tag me using #diaryofadefectivehousewife.

Enjoy!


Sunday, 23 December 2018

Butternut Squash and Garlic Mushroom Wellington

The current topic of conversation both in real life and on social media seems to be 'what are you having for Christmas dinner?' and while my family don't go down the traditional route, we had risotto last year, I wanted to create something semi-festive that was easy to make and felt like a proper treat. This wellington is rich and hearty without being heavy making it the ideal dish for days when eating is the main theme... this will either serve 2 or 4 people depending on portion size!


Ingredients:
1 butternut squash - try to pick one with a small seed area
1 roll puff pastry
2 red onions
1/2 tsp nutmeg
1 tbsp butter
400g mushrooms
4 - 6 large cloves garlic
salt and pepper
olive oil

Method: 

Preheat your oven to 200c fan and wash your squash. Chop the squash just above the seed area and take the top of the squash, cut it in half lengthways and coat with olive oil. Place on a baking tray and bake for 20 minutes until soft to the touch and the skin has turned golden. Peal the skin from the squash while its still hot and scoop out some of the flesh to create a channel down the length to hold the fillings then place to one side to cool.


While the squash is roasting, finely chop all the mushrooms and fry over a high heat in a tbsp of olive oil. Once the mushrooms have started to reduce, mince the garlic and add in with a generous helping of salt and pepper.

Slice the onions as finely as you can and fry over a low heat in the butter and nutmeg until soft and slightly caramelised.

Carefully unroll the puff pastry sheet then use a rolling pin to extend the dough to the edges of the parchment it comes on. Cut the sheet into quarters and then use scissors to cut the parchment along with the dough for easier handling.


Preheat your oven to 200c fan and lightly flour a baking tray. Place the squash halves on a chopping board with the hollows facing up. Carefully fill half the butternut squash with mushrooms and top with the caramelised onions then place one of the pastry sheets over the top. Peal off the baking paper and repeat the process with the other half of the squash. Place the baking tray over the top of the squash and carefully up end then so the pastry layer is now on the bottom. Take the remaining pastry and cover the squash, pulling the bottom piece up to create a sealed package.

Bake for 15-20 minutes until golden brown and flaky. I have served these with a quick onion gravy and green peas for lunch or as part of a roast with potatoes and green vegetables for dinner.

When you make this, please take a picture and tag me using #diaryofadefectivehousewife

Enjoy!


Sunday, 16 December 2018

Christmas Swirls


I wanted to come up with something a little different this Christmas for family and friends and decided to blend cinnamon swirls and mince pies to make the ultimate Christmas treat. These buns smell incredible right from the start and taste even better. Ideal as a home-made gift, they are surprisingly easy to make. I spiced both the dough and the filling for the perfect festive flavour.


Ingredients:
Dough:
800g strong white flour
7g fast action yeast
1/2 tsp salt
100g caster sugar
500ml milk - I use soy
150g butter - I use dairy-free
1/2 tsp ground nutmeg
1/2 tsp ground cloves
1 tsp cinnamon

Filling:
4 tbsp cinnamon
2 tsp ground cloves
2 tsp ground nutmeg
75g butter
75g caster sugar
10 tbsp mince meat


Method:
Place the milk and butter in a pan over a low heat and melt together until the milk is warm to the touch but not boiling. Place all the other ingredients dough ingredients into a large bowl keeping the salt and yeast apart. Pour over the melted butter and milk mixture and stir with a spatula until the dry and wet ingredients come together.

Turn the dough out onto a well floured surface and kneed for around 10 minutes until the dough is soft and pliable, feeling like the lobe of your ear! Place the dough to one side to rest.

Mash together remaining sugar, butter, cinnamon, nutmeg and cloves in a small bowl.

Take a large piece of baking parchment and lightly flour. Roll out the dough to around 50cm long, 25cm wide and 1cm thick. Spread the butter and sugar mixture evenly over the dough taking it right to the edges. I use my hands as it warms the butter and helps prevent the dough from tearing. Spread a thin layer of the mincemeat over the top.


Carefully roll the dough from the long edge, taking care to tuck the rolls over for a firm and neat swirl. Once a neat roll has been formed, take a sharp knife and cut the roll into 20 evenly sized pieces. Place these on a couple of lightly floured baking sheets and pop in a warm place to prove for at least 20 minutes.


Once the swirls have proved, placed in a preheated oven at 200c for 15 minutes until golden brown and springy to the touch.


Place on cooling racks with kitchen roll underneath to catch any melting sugar drips and leave to set.

When you make these, please take a picture and tag me using #diaryofadefectivehousewife

Enjoy!

Sunday, 9 December 2018

Chocolate Cherry Brownies

The chocolate and cherry cupcakes I made in the run up to Christmas last year popped up on my timeline recently, reminding me what a fantastic flavour combination they are so I had to try to create a slightly festive and different take. These brownies mix a soft centre with generous pieces of cherry and subtle spicing to keep them seasonally appropriate. I've made these a few times now and everyone who has tried them has loved them. Really easy, this recipe would make a great holiday project with kids or a treat for friends at the end of the year. Apologies for my photography skills, the smell distracted me and I rushed the final pics so I could eat them!


Ingredients:
250g plain flour
350g demerara sugar
65g cocoa powder
1 tsp baking powder
1 tsp salt
1 tsp cinnamon
1/2 tsp cloves
250ml water
250ml vegetable oil
1 tsp vanilla extract
1 tub glace cherries, halved


Method:

Preheat your oven to 160c fan and line a 30cm by 15cm baking tray with grease-proof paper. Place all of the ingredients, other than the cherries, into a large bowl and mix until a thick batter forms. It will look like something from a sci-fi movie to start with but I promise it does all mix together.

Add in the cherries and mix thoroughly to ensure they are evenly distributed through the batter. Pour into the baking tray and gently level the top with a spatula. Bake for 25-30 minutes until springy to the touch then allow to cool for 15-20 minutes in the tray before turning out and removing the paper and allowing to cool completely.


Portion the brownies as you wish then serve with a large cup of tea.

Enjoy!

When you make these, please take a picture and tag me using #diaryofadefectivehousewife

Sunday, 2 December 2018

Spiced Stir-Fry Soup

This soup is one of my new favourite dishes when I want something quick and easy to throw together that is warm and comfy and healthy too. The combination of the fresh vegetables with a coconut-y, spiced broth makes this incredibly more-ish. This recipe takes around 20 minutes including prep time and serves 4 hungry people. It would work equally well with whatever veg is in the fridge needing used up.


Ingredients:
1 handful asparagus
1 handful mangetout
1 handful sugar-snap peas
1 medium carrot
1 handful tender-stem broccoli
1 handful baby corn
1 can water chestnuts
1 can bamboo shoots
1 can beansprouts
1 can coconut milk
1 tube lemongrass
1 tube garlic
1 tube ginger
1 handful button mushrooms
1 handful oriental mushrooms
2 rice noodle nests
1 tbsp sesame oil
1 tbsp soy sauce


Method:
Top and tail all of the vegetables and chop into bite sized pieces. Place a wok over a high heat and pop around 2 tbsp of olive oil in. Once the oil is hot, add the carrots and mushrooms and fry until starting to soften. Mix in the rest of the vegetables, water chestnuts, beansprouts and bamboo shoots then stir in the lemongrass, ginger and garlic and fry gently until everything is combined and starting to soften.


Add in the coconut milk and then refill the can with hot water and add this too. Place in the noodles and season with the sesame oil and soy sauce. Simmer until the noodles are cooked through, usually a couple of minutes. Add more soy sauce and sesame oil to taste then serve while hot.

Super simple, this recipe is sure to put a smile on anyones face.

When you make this, please take a picture and tag me using #diaryofadefectivehousewife

Enjoy!

Sunday, 18 November 2018

Lotus Biscuit and Cinnamon Cupcakes

I LOVE Lotus biscuits and the spread is one of my favourite things to have on toast so I decided to try making cakes that celebrated this wonderful creation. Cinnamon is another of my favourite flavours and works perfectly with the spread in these cupcakes to give a warming, indulgent feel. The amount of cinnamon in this recipe may make you think I've made a typo, but I promise I haven't and the taste is not overpowering in the slightest. This recipe makes 12 large cupcakes and can easily be scaled up to feed a crowd. I took these to my work and they lasted seconds. 


Ingredients:
For the cakes:
6oz self raising flour
6oz butter - I use Dairy Free
6 oz light brown sugar
4 generous tbsp lotus biscuit spread
3 eggs
1 tsp baking powder
1 tbsp cinnamon

For the icing:
12oz icing sugar
3oz butter
2 generous tbsp lotus biscuit spread
2 tsp cinnamon
Lotus biscuits


Method:
Preheat your oven to 160c fan and muffin tins with muffin papers. Mix together the flour, butter, eggs, sugar, baking powder and cinnamon until light and smooth then beat in the biscuit spread.

Place around a tbsp and a half of the mixture into each muffin case until all the mixture is used then bake for 20 minutes until springy and golden brown. Place on a baking rack to cool.


Once the cupcakes are completely cool, beat together the icing sugar and butter then add the cinnamon and biscuit spread and mix until combined. If the mixture is a little stiff, gradually add water until the icing is soft and spreadable.


Spread each of the cupcakes with a generous dollop of icing, I use a butter knife dipped in hot water, then place a lotus biscuit on top so it sets into the icing.

Serve with a large mug of hot chocolate for a delicious winters treat.

Please take a picture when you make these and tag me using #diaryofadefectivehousewife.

ENJOY!

Sunday, 11 November 2018

Winter Salad

Having eaten rather a lot of pizzas and other delicious carbs recently my body has been crying out for a salad but I haven't fancied the usual lettuce, cucumber etc combo so I decided to create a hot salad using more wintery vegetables. The addition of the broccoli and asparagus offer a lightness to the dish while the addition of spices gives depth and warmth.


Ingredients:
1 large carrot
4 large fresh beetroot
300g cherry tomatoes
1 tsp all spice
1 tsp celery salt
1 bundle asparagus
1 pack tenderstem broccoli
1 pack woodland mushrooms
2 large cloves garlic
olive oil
butter - I use dairy-free

Method:
Preheat your oven to 160c. Peel and chop the beetroot and carrot into bite sized pieces and place in an oven dish. Add the tomatoes, all spice and celery salt then drizzle with olive oil before mixing thoroughly. Roast for 15-20 minutes until the vegetables are soft.


Trim and chop the asparagus and broccoli into bite sized pieces and steam lightly until just tender then add to the roasted vegetables and toss together.


While the green vegetables are steaming, add a large dollop of butter to a frying pan along with the garlic (crushed) and the mushrooms and saute until soft.


Serve immediately, topping the winter salad with the garlic mushrooms and drizzling over the melted butter.

When you make this, please take a picture and tag me using #diaryofadefectivehousewife.

Enjoy!

Sunday, 4 November 2018

Mediterranean Tart

Having seen all the pictures of peoples beautiful rose inspired apple pies on Instagram recently, I decided to put a savoury spin on the dish combining the rich flavours of the Mediterranean with a luscious buttery pastry. This recipe is a little more fiddly and time consuming than some of my others but I think the results are worth it, both in appearance and taste.


Ingredients:
For the pastry:
225g plain flour
100g butter - i use dairy free
pinch salt
4-6 tbsp cold water

For the Tomato Sauce:
300g ish cherry tomatoes
1 jar sun-dried tomatoes
salt and pepper

For the Filling:
1 large Aubergine
1 large courgette

Method:

In a large bowl, carefully rub together the flour, salt and butter until the mixture resembles bread crumbs. Add the water a tablespoon at a time until the mixture comes together to form a dough. Wrap in clingfilm and place in the fridge for at least 30 minutes.

Pop the cherry tomatoes on a baking tray and drizzle with the oil from the sun-dried tomatoes along with a good sprinkle of salt and pepper. Place in a preheated oven at 160c for 15 minutes or until soft and starting to caramelise. Place the roasted tomatoes along with the sun-dried tomatoes into a blender and blend until smooth, adding more salt and pepper if required.


Finely slice the aubergine and courgette, cutting the larger slices of aubergine in half.

Take the dough from the fridge and roll out on a floured surface to around a 30cm circle. Take a loose bottomed tart tin and carefully drape the pastry over. Take a small piece of excess pastry and use this to push the pastry into the tin, getting into all the corners. Trim the pastry to the top of the dish.  Line the pastry with baking foil and blind bake for 10 minutes, at 160c.


Once the pastry is blind baked, place a generous layer of the tomato sauce over the base then top with the slices of aubergine and courgette in circles to create a flower design. Drizzle with olive oil then bake for a further 15 - 20 minutes until the pastry is golden and the vegetables are cooked.


Allow to cool slightly before removing from the tin then serve instantly.

When you make this, please take a picture and tag me using #diaryofadefectivehousewife

Enjoy!

Sunday, 28 October 2018

Spiced Apple Crumble

This apple crumble combines buttery, sweet crumble topping with soft, spiced apples for the perfect Autumnal pudding. Always a hit in my family, we have had a glut of beautiful fresh apples straight from the tree in the garden and this crumble is a wonderful way to do them justice.


Ingredients:

3lb apples
2 tbsp cinnamon
1 tbsp ginger
1 tsp nutmeg
1 tsp ground cloves
12 oz flour
6 oz butter - I use dairy free
12 oz dark brown sugar
boiling water


Method:

Peel, core and chop the apples into bite sized pieces. Place in a large pan over a medium heat with the spices and enough water to cover the bottom layer of apples. Stew the apples until soft but still holding their shape then spoon the mixture into an oven safe dish.

Pop the butter and flour into a large bowl and rub together until the mixture resembles bread crumbs. Add in the sugar and rub in gently, allowing some lumps to remain. Sprinkle over the apple mixture and spread out to form an even layer.


Preheat your oven to 160C and bake for 15 to 20 minutes until the top is crisp and brown. Serve immediately either on its own or with ice cream.

When you make this, please take a picture and tag me using #diaryofadefectivehousewife.

ENJOY!

Sunday, 14 October 2018

Asian Inspired Spiced Courgette Soup

Ideal for the current weather where its either bucketing with rain but weirdly warm or sunny but freezing; this soup is light, flavoursome and warming. The combination of spices gives an aromatic flavour while the freshness of the courgette helps to lift the dish. Incredibly easy, this soup takes less than an hour to make and tastes fantastic.


Ingredients:
4 medium courgettes
2 onions
1 bag fresh spinach
1 bag small potatoes - roughly equivalent to the courgette
3 tbsp grated ginger
3 tbsp grated garlic
3 tbsp lemon grass
2 tbsp olive oil
1 tbsp sesame oil
salt and pepper to taste

Method: 
In a large pan, gently saute diced onions over a medium heat. Roughly chop the vegetables (this soup is blended so no need to worry about making it pretty!) and add the potatoes to the pan to fry for a couple of minutes. Add the garlic, ginger and lemon grass and enough hot water to cover the potatoes. Boil until the potatoes are almost tender then add the courgettes and spinach.

Once everything is soft, take off the heat and blend; either using a stick blender or a food processor; until everything is smooth. Add the sesame oil and salt and pepper to taste before serving with a slice or five home made bread.

When you make this, please take a picture and tag me using #diaryofadefectivehousewife


Sunday, 30 September 2018

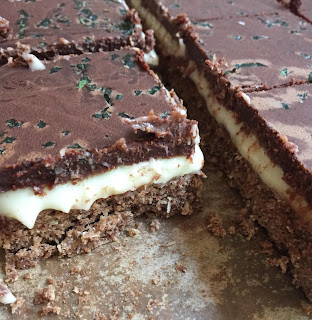
Peppermint Slices

One of the team at my Other Half's work requested these, and always up for a challenge, I decided to make this classically chocolate-y treat completely vegan and dairy-free. I also gave it a twist on the classic using a mint chocolate for the topping and dusting it with finely chopped fresh mint for an additional hit. For me, mint and chocolate has always been a match made in heaven.


Ingredients:
For the base:
2 cups plain flour
2 tbsp Cocoa powder
1 cup brown sugar
1 cup desiccated coconut
250g butter - I used dairy free

For the filling:
4 tbsp milk - I used soy
40g butter - I used dairy free
5 cups icing sugar
1 tbsp peppermint essence

For the topping:
300g mint dark chocolate
180g butter - I used dairy free
handful mint leaves


Method:

Preheat your oven to 160C fan and line a large deep bottom baking tray with greaseproof paper. Place all the base ingredients other than the butter in a large bowl and mix together. Melt the butter over a medium heat and then stir into the other ingredients, coating everything thoroughly. The proportions will look totally off but with a little persistence it all comes together. Smooth over the base of the baking tray, I used my fingers then a small glass to smooth it all out. Bake for 15 minutes until firm to the touch then place to one side to cool.


Melt together the butter and milk for the filling then stir in the icing sugar and peppermint essence, adding more peppermint if you like it mintier. The should have a double cream like consistency; if its too thin, add a little more icing sugar until it thickly coats the back of a spoon. Pour over the top of the base and smooth with a spatula before popping in the freezer to set while you make the topping.


Melting again, this time melt the butter and chocolate together over a low heat, stirring regularly to prevent the chocolate separating. Finely chop the mint leaves and place to one side. Once the filling has set, pour over the melted chocolate and smooth to the edges. Top with the mint for extra pizzaz! Pop back in the freezer for 10 minutes until the chocolate is firm to the touch then remove from the tin and cut into squares. I placed mine back in the freezer for a little longer then take them out about 20 minutes before serving to return to room temperature, this prevents too much messiness.

When you make these, please tag me using #diaryofadefectivehousewife

Enjoy!

Sunday, 23 September 2018

Bread and Butter Pudding

The weather here is cold and miserable again and calls for cuddly food which reminds us all of childhood. I had a loaf of slightly sad, not home-made, bread to use and couldn't resist a heartwarming bread and butter pudding. I love mine packed with spices and fruit, just as my mum makes. This recipe doesnt come with many measurements as it really depends on personal taste and how many layers you create.


Ingredients:
1 loaf sliced bread
Butter -  I used dairy-free
Cinnamon
Ginger
Mixed fruit
Brown sugar
500ml Milk - I used soy


Method:
Preheat your oven to 160C fan and butter a large oven proof dish. Butter each slice of bread on one side and carefully line the bottom and sides of the dish with bread butter side up, I like the crusts on the bread but if you don't then do remove them. Sprinkle the bread with the spices, sugar and mixed fruit then layer over a couple of slices of bread. Repeat the process until all but two of the slices of bread are used. Place these over the top, butter side down, and carefully push down to compact everything together. Pour the milk over the top until you can just see it between the pieces of bread. Top with a generous sprinkle of sugar and spices.


Bake for 20 minutes until the top is crispy and golden then let cool for a few minutes before serving. The pudding should be fragrant and have a crisp top with a soft centre.


My favourite way to use up old bread, this recipe never fails to make people smile. When you make this, please take a picture and tag me using #dairyofadefectivehousewife

ENJOY!


Sunday, 16 September 2018

Potato and Cauliflower Curry with Homemade Naan

I wasn't planning on writing a blog post for this curry and naan recipe yet but I had taken a couple of pictures to send to my brother to tease him as he LOVES a good curry and decided to post one on a Facebook group, almost as a joke. The response was overwhelming with requests so here is the recipe! Please excuse the poor photos, these weren't exactly planned. This went down a treat with my other half who usually does qualify anything as food unless it has meat in, to the point he's requested it for a potluck dinner with his friends. PS... yes, I was eating my dinner in bed!


Ingredients:
For the Curry:
1 large head of cauliflower
Roughly the same quantity of potatoes
1 bag fresh spinach
1 bag mange tout peas
1 can coconut milk
1 can chopped tomatoes
1 tub cherry tomatoes
2 onions
5 tbsp mild tandoori curry powder
2 tsp ground coriander
2 tsp ground cumin
1 tube lazy garlic (6 cloves)
1 tube lazy ginger (3 inch fresh)
1 tub lazy lemongrass (2 sticks fresh)
olive oil
salt and pepper
Boiling water
2 tbsp cornflour

For the Naan:
375g plain flour - plus flour for dusting
2 tsp yeast
1 tsp salt
250ml warm water
1 tbsp maple syrup

olive oil

Method: 
For the curry: 
Grab your largest pan and place it over a medium heat, coating the base with olive oil. Roughly dice the onions and saute in the oil until translucent. Add in the cumin, coriander and curry powder. Chop the potatoes into bite sized pieces and pop into the pan. Add the coconut milk and tinned tomatoes along with a can full of hot water. Half the tomatoes and add these in along with the cauliflower, broken into bite sized florets. Add in the ginger, garlic and lemongrass and leave to simmer for 20 minutes until the potatoes are soft.


Chop the mange tout into bite sized pieces and add to the curry along with the spinach. Once these are lightly cooked, make up the cornflour according to the instructions on the packet and stir in to thicken the sauce. Add salt and pepper to taste, I didn't feel it needed much.

If you can leave this overnight and reheat it, even better. The flavours mature overnight and give a depth which is delicious.

For the Naan:
Place the flour, salt and yeast in a bowl and mix together. In a jug, mix the water and maple syrup until the syrup has melted. Add to the flour mixture and bring together. Tip onto a floured surface and knead for a couple of minutes until the dough is smooth and springy.

Place in an oiled bowl and leave at room temperature to prove for 30 minutes.

Cut the dough into 6 pieces and roll each piece out to a rough oval around 1cm thick. Make sure to flour both your surface and rolling pin as the dough is quite sticky.


Place a frying pan over a high heat with a teaspoon of olive oil. Place one of the naans into the pan and fry for 2-3 minutes until large bubbles appear on the top then flip over. The cooked side should be crispy with darker patches. Fry for a further couple of minutes to crisp the other side. Repeat until all the naan are cooked, I place them in a tea towel to keep warm before serving.

I served this curry with the naan and some basmati rice but have also had it on its own as a quick lunch, especially if there's some left over.

When you make this, please take a picture and tag me using #diaryofadefectivehousewife

Enjoy!